

OpenVPN CloudConnexa with Oracle Cloud
- Nathan Hill
- Jan 10
- 5 min read
Overview of OpenVPN CloudConnexa
OpenVPN CloudConnexa is a cloud-based VPN service that enables you to implement scalable and secure network access within your cloud environment.
Some of the key benefits of implementing OpenVPN CloudConnexa are below,
OpenVPN is a managed service, this results in OpenVPN handling the configuration and maintenance of the VPN infrastructure. This makes it easy to use and reduces the need for IT expertise.
OpenVPN CloudConnexa is based on the open-source OpenVPN software, this is regarded as one of the most secure VPN protocols available. It utilises strong encryption to protect your data.
OpenVPN CloudConnexa is available in a variety of plans to suit different needs and budgets. It is a good choice for businesses that need a reliable and secure VPN solution but may not have the resources to manage their own VPN infrastructure.
The key difference between CloudConnexa and OpenVPN access server is CloudConnexa is a cloud-based VPN service whereas, OpenVPN access server is self-hosted. As a result of this, CloudConnexa can be used to connect to different networks and clients simultaneously whereas, OpenVPN access server would be configured on a per client/network basis. Depending on your needs as a business, CloudConnexa can be fully leveraged to support the configuration and management of multiple clients and networks within a single management portal.
Useful links
Introduction to CloudConnexa: https://openvpn.net/cloud-docs/owner/get-started/about-cloudconnexa/introduction-to-cloudconnexa.html
CloudConnexa Connectors: https://openvpn.net/cloud-docs/owner/get-started/about-cloudconnexa/cloudconnexa-connectors.html
OpenVPN Access Server & CloudConnexa comparison: https://openvpn.net/product-comparison/
Within this blog, we shall be configuring OpenVPN CloudConnexa within Oracle Cloud Infrastructure.
Prerequisites
You will firstly need to sign up and create a new free CloudConnexa account, see link below for account creation,
This is an important first step before we proceed with further configuration steps, as the CloudConnexa account will be used in later stages for connecting to the OpenVPN via CloudConnexa user account URL. The CloudConnexa free trial provides 3 concurrent OpenVPN connections.
Architecture overview within OCI
2 instances have been created within 2 separate subnets, the OpenVPN Cloud Connector instance has been created within the Public Subnet, and a Private test instance has been created within the Private Subnet. The instance shapes used in this blog were Ubuntu 22.04 image and Ampere A1 shape for the Public OpenVPN Cloud Connector instance, and Oracle Linux 8.6 image and Ampere A1 shape for the Private test instance. The purpose of these instances is to evidence successful connection to Private resources via a secure Public OpenVPN.
For routing, standard route table rules are required within the subnet’s route tables (internet gateway rule for the Public Subnet and NAT Gateway & Service Gateway rules for the Private Subnet)
For networking, 2 Network Security Groups were created for the instances, the Public & Private NSGs are attached to the corresponding instances after creation. NSG security rules are configured to allow traffic between the Private and Public Subnets. For initial SSH access to the Public OpenVPN Cloud Connector VM, add your public IP address as an Ingress rule for 22 SSH access, this is required for later configuration of the OpenVPN Cloud Connector instance.
After the creation of the Public OpenVPN Cloud Connector instance, ensure to tick the Skip source/destination check VNIC via navigating to the Attached VNICs of the instance and select Edit VNIC in the options menu.
High Level Networking Overview
Subnets

Network Security Groups


Route Tables


CloudConnexa configuration
Access your CloudConnexa account portal, click on the Networks tab and choose Remote Access as the Network Scenario, click Continue.

Choose a suitable name and description for your Network and choose OpenVPN as the Connector Tunnelling Protocol.

Scroll down the page and choose a suitable name and description for your Connector. Ensure to select the same region as your OCI tenancy region and click Next.

Choose Operating Systems: Linux for the connector type, select Ubuntu 22.04

Scroll down the page and copy the following script, and generate/save the token. Both the script and the token will be pasted onto the Cloud Connector instance.
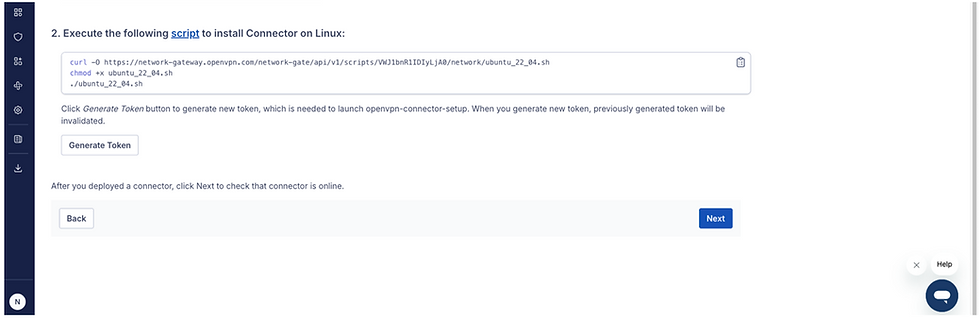
To access the Cloud Connector instance, ensure to allow your Public IP address for SSH 22 connection within the Private NSG. Proceed to accessing the instance using your chosen SSH access method and paste the provided script onto the instance, then paste the generated token once prompted.


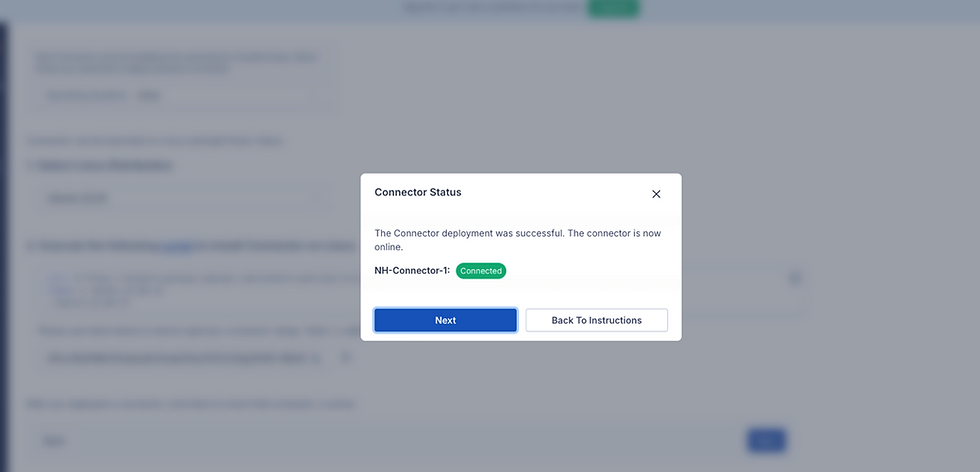
Now we need to navigate back to the CloudConnexa portal and click Next to determine if the Connector Status is online. If successful, it should display the below message. Then click Next.
Before we proceed further with the CloudConnexa setup, please ensure to run the below commands on the Cloud Connector instance, these commands enable the connectivity via the iptables on the instance.
sudo iptables -t filter -I FORWARD 1 -j ACCEPT && sudo iptables -t filter -I INPUT 1 -j ACCEPT
sudo iptables-save | sudo tee /etc/iptables/rules.v4


Navigate back to the CloudConnexa portal, click Next on the Add Application screen, this is not required within this blog.

In this instance, routes and IP services were added for the Private and Public Subnets only within OCI, the full VCN range can be added for full VCN connectivity if required. Select Next to continue.

In this blog, no further Access Groups were created, and the default access group remains, click Finish to finish setup.

You should now be able to view the newly created CloudConnexa network.

The next step is to connect to the CloudConnexa via the OpenVPN client software, if you do not already have the OpenVPN client software, see installation link below,
We now need to open the OpenVPN client software, click on the Hamburger menu, click Import Profile, enter Cloud ID.openvpn.com in the VIA URL tab (the Cloud ID can be located in the Cloud Connexa online account portal). Once entered, you should then be prompted to Sign In.
Once you have been redirected, select the Region closest to your OCI tenancy region, then click Continue.
You should then see a prompt to Confirm within the OpenVPN client software, click Confirm and select the connection toggle next to your imported OpenVPN profile. The OpenVPN should then be able to successfully connect on your local device. Once connected, SSH access should be successful to your private instance.
Due to the subnets being added as an Route and IP service within CloudConnexa, any further instances that are created within the Private or Public subnets will be accessible via the CloudConnexa OpenVPN, please ensure the NSG is also added to any further instances for accessibility.
In terms of adding new subnets and associated resources to the CloudConnexa, ensure the below actions are configured,
New subnet IP range is added as a Route and IP Service within CloudConnexa
Port communication is open between the new subnet and the Public subnet via the Network Security Groups.
NSGs are attached to resources within the new subnet.
Conclusion
By following the above steps, I successfully configured and utilised OpenVPN CloudConnexa to connect to a private networked resource via secure public OpenVPN access. In this blog, only 2 instances were created for connectivity test purposes however, you can utilise OpenVPN CloudConnexa to connect to several instances, subnets and networks within the CloudConnexa portal.
I hope this blog has increased knowledge and awareness of OpenVPN CloudConnexa and the benefits it may deliver.
Comentários